OZSALE & NZSALE Branded Portal
Summary
OZSALE & NZSALE (MYSALE Group) is the leading online shopping club in Australia and New Zealand and your doorway to affordable designer fashion.
This help guide will walk you through how you can onboard yourself on to the OZSALE & NZSALE Marketplace in order to sync products, stock, orders and order updates via Shopify.
Service Fee
The first thing you need to do is to pay for the service fee to use this application.
- When you first login to https://ozsale.crescodata.com/ you will see a warning message - "Payment is required to activate your services. Click here to make your payment."
- The quarterly subscription is AUD$165 inc GST and will automatically be charged quarterly.
- Service can be terminated at any time. There is no refund offered for this service.
- This is required before any services can be activated.
- Clicking the link, will take you through to a payment page.
- Please note this is a quarterly payment, with a minimum term of 12 months.
- Once payment has been made, this will redirect you to our Branded Portal to complete setup.
Manage Billing
You can edit your credit card details by clicking on the top right icon and selecting Manage Billing.

This will direct you to a Stripe hosted page to change / update your credit card details.
It also allows you to view your previous billing history.
Video Guide
Settings
Connection details
Upon logging into https://ozsale.crescodata.com/, first go to "Settings" from the left navigation.
Here you will be asked to add in your connections details for Shopify and OZSALE & NZSALE. Please review the below on how you can access these details.
OzSale
- This will be provided by your OZSALE & NZSALE account manager.
Shopify
- Log in to your Shopify admin account: https://www.shopify.com/login
- On bottom of the left hand side of the dashboard, select "Apps" from the left navigation.
- Then click App and sales channel settings
- Next click Develop apps
- Then click Create an app
- Specify the title of the custom app, provide a contact email account and click Create app.
- Next click Configure Admin API Scopes.
- Provide the below Read and Write permission
-
Assigned fulfillment orders
-
Customers
-
Fulfillment services
-
Inventory
-
Locations
-
Merchant-managed fulfillment orders
-
Order editing
-
Orders
-
Payment terms
-
Product listings
-
Products
-
Third-party fulfillment orders
-
- Once the above has been ticked, click Save.
- This will provide you with a new button at the top right to Install app.
- Once installed this will take you to a page to Reveal token once - Please copy this token to be used in the portal.
- Authentication details will then be provided to load into the Shopify section of the Portal.
- URL - Your myshopify.com url. i.e. https://ozsale.myshopify.com
- API Secret Key - API secret key from the custom app screen where the token was saved.
- Shop Currency - You can select the base currency your products and orders data prices need to be managed via CrescoData.
- App Type - Select the app type created in Shopify. Mostly like should be Custom App.
- Admin API Access Token - Token saved above.
Once completed, click "Next"
Products
- Product Level Category Method - Categorisation Method is an option to define which attribute/field CrescoData should consider for taking the product category value from Shopify Payload.
- Map from Tags - CrescoData will use the category id value from tags provided by the customer against the product.
- Map from Metafields - CrescoData will use the category id value from meta fields name/key provided by the customer against the product.
- Pull metafields - Turn the toggle on, if you want to pull the metafields information inside the payload against the product. By default, this will be off.
- Stock buffers - If you want to add a buffer to stock retrieved from Shopify, then add a <number> we should deduct to send to OZSALE & NZSALE.
- Price Adjustment - This price adjustment field is only for your OzSale AU store only. Example: Input 10 to add 10 percent or -10 to subtract 10 percent from prices synced to OzSale.
- Sync Rrp - Whether to send RRP prices to the OzSale AU store.
- Sell in New Zealand - If toggled on then:
- NZD Currency Conversion Method - Select how you want to convert your Shopify currency (Based on Shop Currency selected previously) to NZD.
- Global Conversion Rate - Automatic price conversion based on exchange rate data delivered from over 15 reliable data sources, every minute. Sources include banks and financial data providers.
- Custom Conversion Rate - Manually defined exchange rate. For example, input 1.3 to multiply your prices by x 1.3 when selling on OzSale NZ.
- NZD Price Adjustment - Example: Input 10 to add 10 percent or -10 to subtract 10 percent from prices synced to OzSale NZ.
- NZD Sync Rrp - Whether to send RRP prices to the OzSale NZ store.
- NZD Currency Conversion Method - Select how you want to convert your Shopify currency (Based on Shop Currency selected previously) to NZD.
- Next toogle both of the Shopify and OZSALE & NZSALE services from "Not Active" to "Active".
- Click "Next".
Orders
- Toogle both of the Shopify and OZSALE & NZSALE services from "Not Active" to "Active".
- Sync Order Number - If yes then we will use the OZSALE order number. If no, we will use Shopify's default order incremental number.
- Default Stock Fulfillment Location - The default stock location to decrement quantities from when fulfilling or refunding orders if a location mapping is not found. Defaults to the first location on your Shopify account otherwise.
- Inventory Behaviour
- bypass: Do not claim inventory.
- decrement_ignoring_policy: Ignore the product's inventory policy and claim inventory.
- decrement_obeying_policy: Follow the product's inventory policy and claim inventory, if possible.
- Click "Save" to complete the setup.
This will schedule the download of products from Shopify. Also sync any future orders from Ozsale to Shopify.
Publishing products to OzSale & NZSALE
Below is the process of how you publish products from Shopify to OZSALE & NZSALE. These steps must be taken in order for products to publish, so please follow them carefully.
Category allocation
Category mapping can be done in three different ways - Bulk Mapping, Tags or Meta Fields.
Noting that Bulk Mapping is the default allocation, with the ability to overwrite at a product level with a tag or Meta Field. This is based on the Product level Category Method selection in the Product settings.
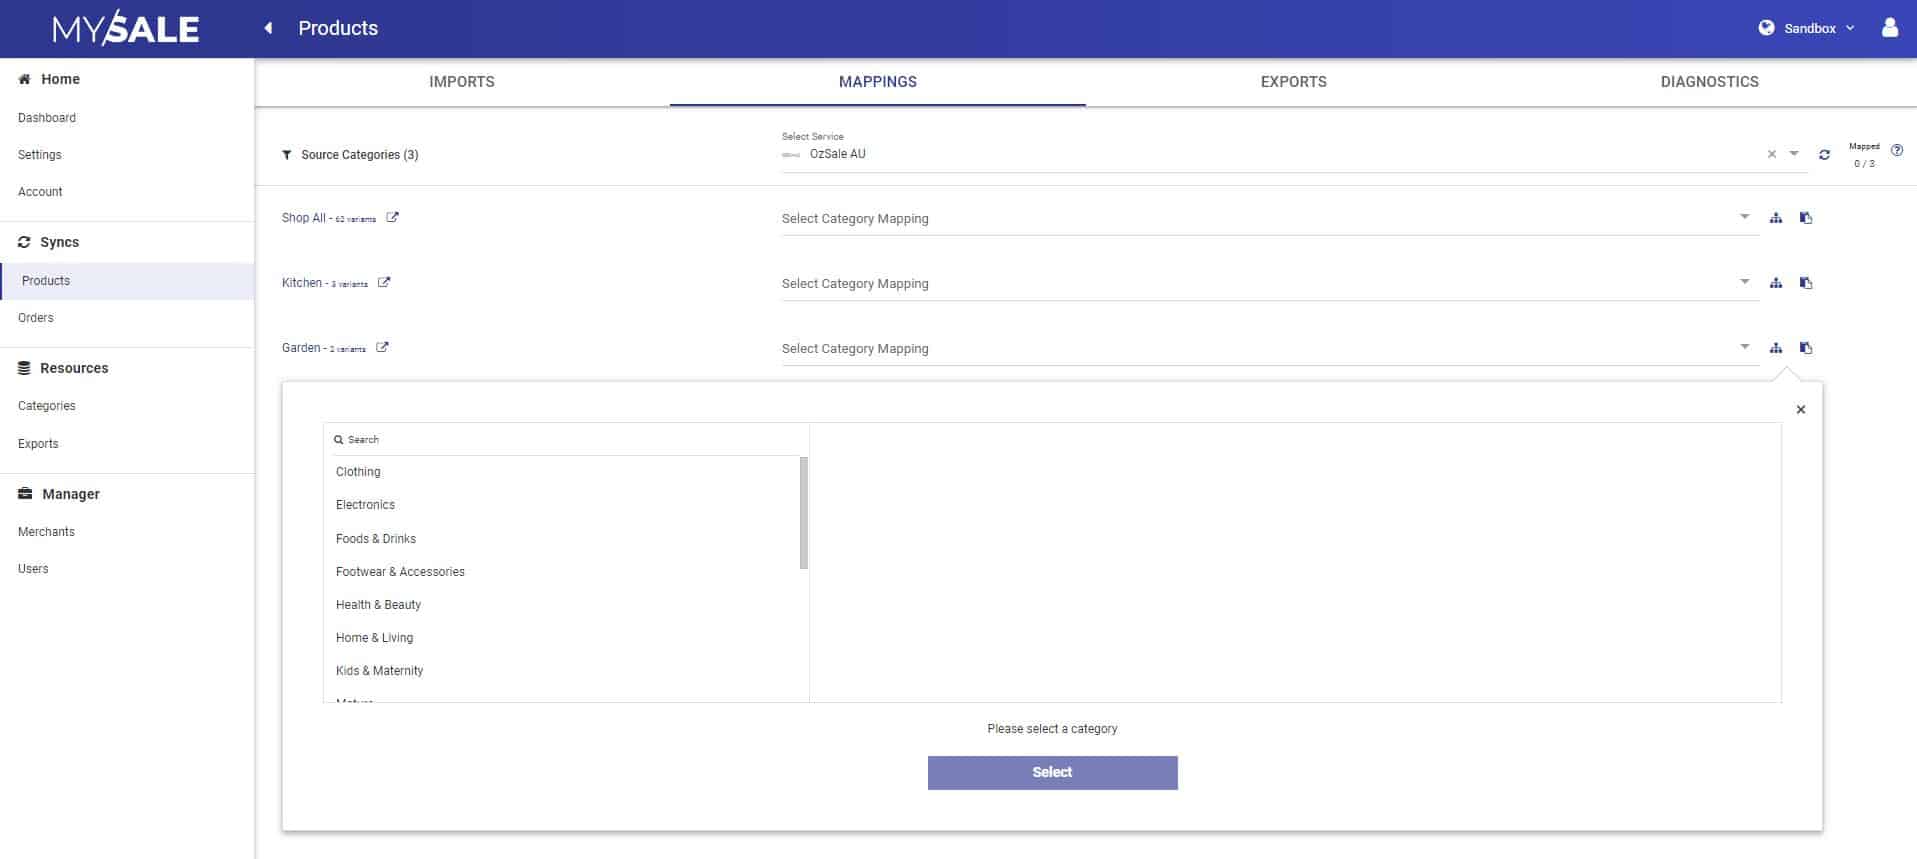
Bulk Mapping
This allows you to map the Product Type from Shopify to an OZSALE category by doing the below:
- Go to "Products"
- Go to the "Mappings" tab.
- Here you will see all unique Source Categories to map to an OZSALE category.
- Noting you can:
- Filter Source Categories by keyword.
- You can copy an OZSALE category mapping and paste to other Source Categories that will use the same category.
- You can filter an OZSALE category by keyword or drill down.
If you want to change the category of a specific product, you can use a tag or Meta field as below which will take priority over a Bulk Mapping.
Using tags
Below is how you can create a Shopify "tag" to define what category the product should be published to in OZSALE & NZSALE.
Products will only be published to OZSALE & NZSALE, if it has one of these tags.
-
Go to the “Categories” link from the left navigation.
-
Click on the "Export" button to export all category.
- This will link you to "Exports" where you can download the OZSALE & NZSALE category list.
-
Review the category list and find the categories most relevant to your products.
-
Go into Shopify and filter on products that should go to the same OzSale category. Bulk apply the tag to products in Shopify. Tag format is:
-
OZ-ID_<Category ID> (Column from the category list export).
-
Example - If we want to list a product under “Clothing > Mens > Activewear > Compression Clothing” in OzSale, we would apply the tag “OZ-ID_90aa74db-6f7f-452c-8640-3223baf8aca2”
-
-
We will then sync the product to OZSALE & NZSALE automatically - No additional action required.
Using Meta Fields
Below is how you can create a Shopify Metafield to define what category the product should be published to in OZSALE & NZSALE.
- Under Categorisation Method select - Map From Metafields.
- Also toogle on Pull metafields
Products will only be published to OZSALE & NZSALE, if it has a value under the Metafield ozsale_category
-
Go to the “Categories” link from the left navigation.
-
Click on the "Export" button to export all category.
- This will link you to "Exports" where you can download the OZSALE & NZSALE category list.
-
Review the category list and find the categories most relevant to your products.
- Follow the help guide HERE on how to create a Meta Field.
- Name the meta field - ozsale_category
- Once created you can go into a product and find the meta field section to add the OZSALE category ID.

Country of Origin
If you can to define the country of origin per product, then please follow the below steps:
-
Tag each product using the following format - OZ-country:<country code> i.e. If it Manufacture Country is Australia then the tag would be “Oz-country:AU”
-
Review the “Alpha-2” Country code list HERE
-
Otherwise there is a setting to define a default country for all products, as above.
Shipping Policies
If you want to define a shipping policy per product, then please follow the below steps:
- Tag each product using the following format - OZ_shipping_policies:<policyID>
- The policyID is located in Mysale as below:

Allow and Excluded Country
If you want to sell your products in both New Zealand and Australia, or exclude on either then follow the below steps:
Tags
- Allow selling:
- To sell in New Zealand, use the tag - oz-allowed-NZ
- To sell in Australia, use the tag - oz-allowed-AU
- Exclude selling:
- To exclude selling the product in New Zealand, use the tag - oz-excluded-NZ
- To exclude selling the product in Australia, use the tag - oz-excluded-AU
NOTE - If no tags are added then by default the product will be sold on all regions.
Meta fields
- Allow selling:
- To sell in New Zealand, create the metafield - oz-allowed-NZ and for each product add the value y.
- To sell in Australia, create the metafield - oz-allowed-AU and for each product add the value y.
- Exclude selling:
- To exclude selling the product in New Zealand, create the metafield - oz-excluded-NZ and for each product add the value y.
- To exclude selling the product in Australia, create the metafield - oz-excluded-AU and for each product add the value y.
NOTE - If no metafields are created then by default the product will be sold on all regions.
Markup / Markdown Price
If you want to markup or markdown the price from Shopify to OzSale per product, then please follow the below steps:
- Tag each product using the following format - OZ_adjustment_price:<%increase/decrease>
- Markup - The tag for a percentage markup would be "OZ_adjustment_price:10" to increase the price by 10%.
- Markdown - The tag for a percentage markdown would be i.e. "OZ_adjustment_price:-10" to decrease by 10%.
Deactivate a product
If you have previously created a product and want to deactivate the product, you can deactivate either by:
- Update the product with this tag "OZ-deactivate"
- Removing the category tag or meta field.
- If you have added an API Secret Key under the Shopify settings and you delete a product in Shopify, this will also deactivate a product in OzSale. Please follow the below videos depending on your Shopify App type:
Product Diagnostics
The below video explains the Diagnostic tab of the Product Sync area.
Noting that the below video portal is slightly different in that:
- Integration Diagnostics is the same as Diagnostics in the OZSALE portal.
- Results is the same as Sync Results in the OZSALE portal.
Orders
-
Once an order is placed on OZSALE & NZSALE it will sync to Shopify.
- We will use the same Shopify order sequence when creating orders.
- If you want to reference the original OZSALE & NZSALE customer order number, this is located in the Shopify order notes.
- Orders will be auto-acknowledged back to OZSALE & NZSALE.
-
You can then go into Shopify and fulfill the order, ensuring a tracking number and carrier is added.
- Click on "Fulfill items"
- Add a Tracking Number and Carrier.
-
This will then publish a shipment update to say the order has been fulfilled.
Order Diagnostics
The below video explains the Diagnostic tab of the Order Sync area.
Noting that the below video portal is slightly different in that:
- Integration Diagnostics is the same as Diagnostics in the OZSALE portal.
- Results is the same as Sync Results in the OZSALE portal.
Health Dashboard
The Health Dashboard is about providing transparency through a one-page summary of a merchant's CrescoData setup, providing key actionables and a summary of performance at a glance.
Video Overview
Key Sync Types
Products
- No. of Products - Based on the number of products synced to a destination channel within the last 30 days. It is not the total number of products under your setup, only the products that have updated in the last 30 days.
- Percentage of Products with success - Based on a success response at a variant level as a percentage of all responses received over the past 30 days.
- Percentage of Products with warning - Based on a warning response at a variant level as a percentage of all responses received over the past 30 days.
- Percentage of Products with error - Based on an error response at a variant level as a percentage of all responses received over the past 30 days.
- Error Summary - Shows all error responses by high level category, with the ability to click into each category to see what actions are required to fix the error.
Orders
- New Orders - Last 7 Days - Total number of orders over the last 7 days, with a comparison to the last 7 days to see if sales have increased or decreased. Both numbers are clickable to review the specific orders within each time period.
- New Orders - Last 30 Days - Total number of orders over the last 30 days, with a comparison to the last 30 days to see if sales have increased or decreased. Both numbers are clickable to review the specific orders within each time period.
- Order Value - Last 30 Days - Total order value over the last 30 days, with a comparison to the last 30 days to see if sales have increased or decreased.
- Order Status - A summary of orders from the last 30 days and what status they are in.
- Total New Orders This Week - Graph showing order numbers per day, over the last 7 days.
- Error Summary - Shows all error responses by high level category, with the user clicking into each to see what actions are required to fix the error.
Troubleshooting
I am receiving an email from Shopify - Your webhook is failing. What do I do?
This means you have entered your shared secret or API Secret Key incorrectly.
Please follow the videos depending on your Shopify App type.
How do I delete webhooks?
If you want to remove the webhooks all together to prevent any more email failures, please follow the steps below:
- From your Shopify admin, go to Settings > Notifications.
- Scroll down to the Webhooks section.
- Next to the webhook you created, there should be a little trash can icon.
- Click the trash can icon to delete the webhook.
How do I review the exchange rate used to convert to NZD?
If you selected Global Conversion Rate to convert your prices to NZD, you can review the exchange rate used by:
- Go to Settings and the Product section.
- Under the NZD Currency Conversion Method if you Global Conversion Rate is selected, you will see the text - View the current exchange rate by clicking the
here - After clicking the link, you will be redirected to currency exchange page. Here you can change the From currency and the date you want to review the exchange rate for.